Convert DOCX to PDF with PDF Creator Plus
Converting DOCX to PDF is a snap with this economical and easy-to-use PDF creation software. With many built-in features, PDF Creator Plus is a complete solution for converting Microsoft Word DOCX and DOC to PDF and any file from a Windows application that can print.
The Advantages of PDF Creator Plus
What makes PDF Creator Plus shine is that it is a PDF builder. You could always convert DOCX to PDF using Microsoft Word’s export feature. However, this limits you to a single PDF file. PDF Creator Plus makes it easy to merge your DOCX and DOC files with existing PDF files and any other document you can print. Combining documents for reports and sharing just got easier.
- Includes a Word Add-In for creating PDFs with hyperlinks and bookmarks.
- Drag and drop PDF files to quickly add your Word document to an existing PDF file.
- Easily merge DOCX and other files together into a single PDF.
- Preview, add, organize, and delete unwanted pages before creating your PDF.
- More than just PDF, PDF Creator Plus can also create TIFF, JPEG, and BMP images.
Installing PDF Creator Plus
Download and install a free trial to try it out, or install and activate your purchased copy. This adds the PDF Creator Plus app, Save As PDF 8.0 Word Add-In, and PDF Creator Plus 8 virtual printer to your computer.
PDF Creator Plus can convert DOCX to PDF in two ways. The first and easiest way is to print the Word document to the PDF Creator Plus 8 printer. The second method uses the included Save As PDF 8.0 Add-In in Word to create a PDF with a table of contents and hyperlinks.
Convert DOCX to PDF – The Basics
Let’s explore the basics of printing our Word document to PDF Creator Plus to create a PDF. If you need a PDF with a table of contents and link information, jump to the section Converting a DOCX to PDF with a Table of Contents and Links.
Open your DOCX file in Word and go to File – Print in the menu. Next, select PDF Creator Plus 8 from the list of printers, then click Print.

The PDF Creator Plus 8 printer sends your printed DOCX pages to the PDF Creator Plus app. In the app, you can move or delete pages. There are also tools to mark up pages with text, shape, and image annotations.
You now have two options: create your PDF or add more pages by printing from Word or other apps.

Creating your PDF File
Once you have added all the pages from your DOCX or DOC and other files to the PDF Creator Plus app, it is time to create your new PDF file. To begin, select the Create PDF button in the task window.

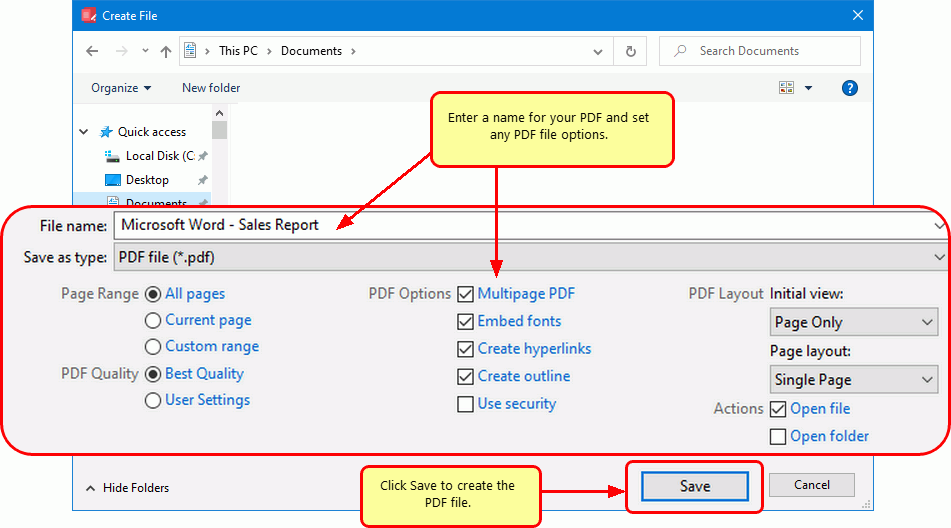
In the Create File dialog, edit the name for your new PDF file and choose where to save it. Next, set your options for creating a PDF file:
- Select PDF file (*.pdf) as the Save as type.
- Check the Multipaged PDF and Embed Fonts options.
- If you added hyperlinks or outline information annotations by hand, check the options for Create hyperlinks, Create outlines, or both.
- Keep the Open file option enabled to open PDF automatically upon creation.
Click the Save button when you are ready to create your PDF file.

As PDF Creator Plus generates your new DOCX to PDF, a progress dialog will pop up. If you wish to change the PDF, click the Cancel button to halt the process. Make any desired adjustments and start again.

Converting a DOCX to PDF with a Table of Contents and Links
The second way to convert DOCX to PDF and DOC to PDF is to use the Save As PDF 8.0 Add-In included with PDF Creator Plus. Using the add-in to send Word documents to PDF Creator Plus creates a PDF with hyperlinks and a table of contents.
Using the Save As PDF 8.0 Add-In
Open your document in Microsoft Word and select the Save As PDF 8.0 button from the Add-Ins tab on the ribbon.

In the PDF Bookmark Creation Settings dialog, choose which headings and styles in your Word document to include as your table of contents in the PDF file. The default settings use Heading 1, 2, or 3 text to generate Level 1, 2, or 3 bookmarks in Adobe PDF. Click the OK button to start.

A progress dialog displays the steps as the Save As PDF Add-In works on your document; this may take some time when processing complex documents.

When complete, the Add-In sends the pages, the bookmarks, and hyperlinks to PDF Creator Plus.

Creating a PDF File with a Table of Contents and Links
You can now create your PDF file or continue adding more pages using the Word Add-In or by printing from Word or other apps.
When you have added all the pages you want to include in your PDF, click the Create PDF button in the task window.
In the Create File dialog, choose the name and location of your new PDF file. The next step is to set your options for creating the PDF file.
- Select PDF file (*.pdf) as the Save as type.
- Check the Multipaged PDF and Embed Fonts options.
- Check the options for Create hyperlinks and Create outlines to include this information in the PDF. You can also manually add hyperlink and outline annotations.
- Keep the Open file option enabled to open PDF automatically upon creation.
When you are ready to create your PDF file, click the Save button.
As PDF Creator Plus generates your new DOCX to PDF, a progress dialog will pop up. If you wish to change the PDF, click the Cancel button to halt the process. Make any desired adjustments and start again.

